
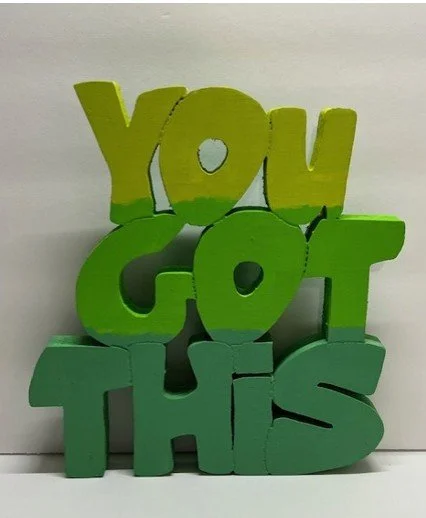
You Got This
Everyone loves a little encouragement, and when my sister was promoted to Director at her daycare, I knew she might be feeling a little nervous.
To celebrate her achievement and lift her spirits, I created a standing plaque—hoping it would bring a smile to her face!
Want to see how I did it?
Here’s my step-by-step process using Cricut Design Space (free version—no Access needed).

1️) Choosing the Font
For wood cutouts, I prefer thick fonts to ensure durability. This time, I used Honey Bear—a cute, bold font full of character.
2️) Setting Up the Letters
I type each letter individually so I can arrange them exactly how I want. Without changing sizes, I type out my phrase, select all letters, and resize them to get a clear view of the design.

3️) Arranging the Layout
Starting with the word "YOU," I align it to the bottom as my anchor. From there, I adjust each letter, placing them carefully to create a balanced design.

4️) Preparing for the Scroll Saw
Since I’m cutting on 1-inch thick wood, I avoid fragile, thin areas that could break easily.
I switch the design from CUT to PEN mode to create a pattern, then:
🪵 Sand the wood—a smooth surface makes everything easier later.
📌 Apply tape to the wood, then spray with glue to secure the pattern.
🔨 Drill holes in the inner sections (like the O’s).
✂️ Use the scroll saw to cut out the saying.
🖌 Sand edges for a polished finish.
5️) Final Touch—Painting! 🎨
For my sister, I painted her sign in three shades of green—her favorite color. It turned out so cute, and most importantly, meaningful.
This is such a fun and simple way to create custom encouragement signs—a heartfelt gift for a loved one or a little boost for yourself!
What’s your favorite saying? Let’s get creative!
